Using the A-Frame Inspector
Introduction
In this activity you will learn about the Inspector tool in A-Frame. The Inspector tool shows a view of the VR scene that makes it easy to see all of the entities in our scene and make changes to the entities. The tool can be particularly useful when we are trying to find bugs in our code or when entities don’t appear in our scene as we expect them to.
The Inspector gives us a view of the scene that looks similar to some 3D editor software, such as Blender or Unity.
A screenshot of the Inspector open on the Hello WebVR scene is shown below:
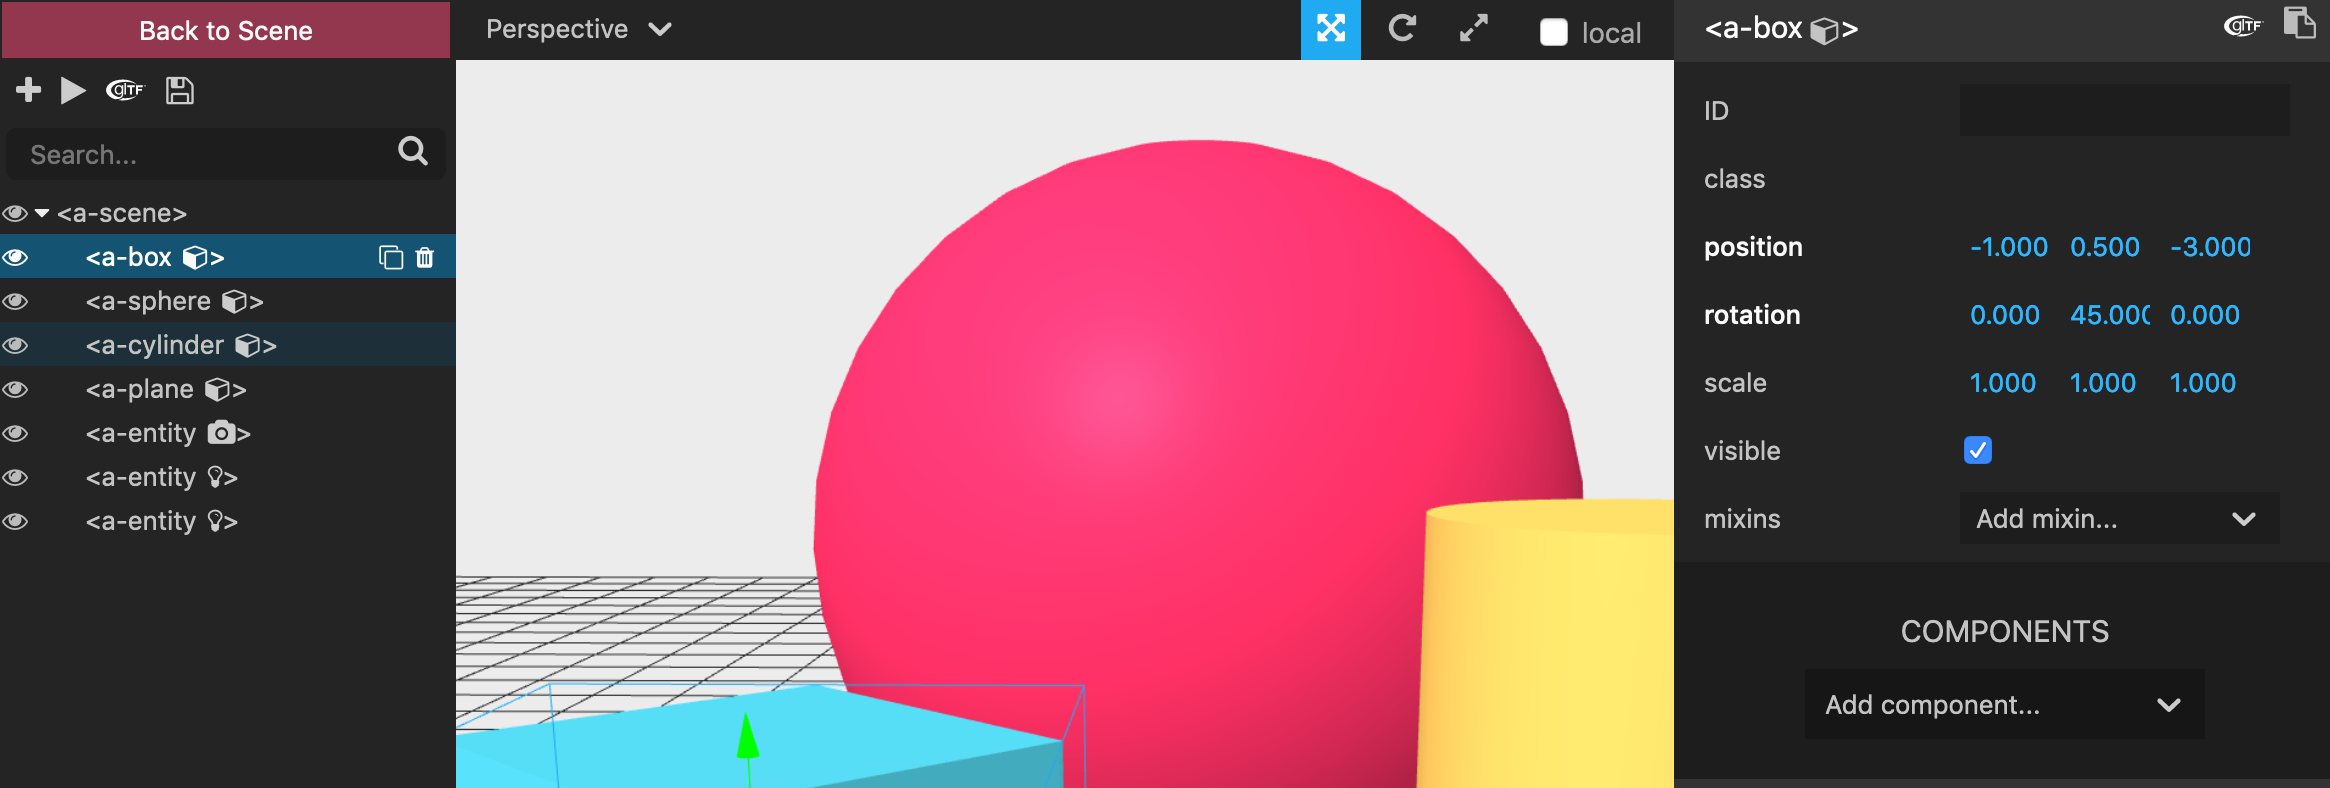
We will explore some different VR scenes with the Inspector today and you will learn about a few key features of the Inspector. If you would like to find out more about the Inspector tool, we recommend that you read the official documentation for the tool on the A-Frame website.
Opening the Inspector
The Inspector can be opened on any page that uses A-Frame by pressing ctrl + alt + i keys on your keyboard, at the same time.
The first step in this activity will be use the Inspector to view the Hello WebVR scene that we looked at in the last session. We will look at the version of the Hello WebVR scene in A-Frame’s Showcase for this part of the activity, which is available here.
Follow the Hello WebVR link above and open the Inspector by pressing the ctrl + alt + i keys.
When the Inspector is open, you can not enter VR Mode by clicking the button. To return to back to the view where the is shown, you can click the Back to Scene button on the top left of the Inspector.
Once you have opened up the Inspector once, you can re-open it by pressing the ctrl + alt + i keys on your keyboard or by clicking the Inspect Scene button, which will be on the top left of the screen until the next time you refresh the page.
Using the Inspector
The A-Frame Inspector is a powerful tool that can be used to see how changes to the different entities in your scene will impact what your scene looks like.
The features of the Inspector include, but are not limited to:
- Adding entities: you can add new entities (for example, 3D shapes) to a scene
- Exporting to GLB file: you can download your scene as a 3D model in .glb format (which you could then view in another 3D editor)
- Adjusting properties:: you can make changes to an entity’s properties (such as scale or position), which we will try out in the next part of this activity
Shapes, such as the box and sphere in our scene, and most of the other entities in A-Frame have a position. We use 3D positioning for VR and, consequently, a position in A-Frame is 3 numbers: an x co-ordinate, a y co-ordinate and a z co-ordinate.
For example, in the code below we have a box entity that is in the position (-1, 0.5, -3).
<a-box position="-1 0.5 -3" rotation="0 45 0" color="#4CC3D9" shadow></a-box>
Note that the camera in A-Frame starts off by facing in the negative z direction, unless we change its rotation. That is why all of the entities in the Hello WebVR have a negative z co-ordinate.
There are also properties that affect an entity’s size and their rotation, which all consist of three numbers. The main properties of entities that we will explore today are:
- position: where in the 3D co-ordinate system the entity is positioned.
- rotation: we can change how the entity is rotated. For example, look at the code for the box above and explore what happens when you change the values in the rotation property
- scale: how big the entity is. Note that you can change the scale across the three different axes (x, y, and z)
We will show you some ways of changing these properties on an entity through the Inspector. Note that you can use the helpers at the top of the Inspector, which are pictured below, to change the property that is affected by dragging the arrows on an entity

We used the Inspector to view all of the entities in one of the projects from the A-Frame Showcase - the Hello WebVR project . However, the A-Frame Showcase has a a variety of projects - not just the Hello WebVR scene. Some of the other projects from the A-Frame Showcase that you may want to view in the Inspector are:
The projects in the A-Frame Showcase use a variety of different types of shapes and vary in their complexity.
See if you can make some changes to those projects, such as the position and scale of entities, using the Inspector. You may also want to try changing other properties (not just position, rotation and scale) as well, such as the text that’s displayed in the 360° Image. The Animation project includes animations that make the spheres move back and forward in that scene. You could try and see what happens when you change the properties of the animation components in that project as well.
Making Changes to the Scene
The changes that we make in the Inspector do not take effect permanently unless we change the actual HTML itself. If we just make the changes in the Inspector, the scene will revert back to how it looked before we made changes in the Inspector as soon as we refresh the page.
In this part of the activity, we will make some changes in the Inspector and also make these changes in the Glitch project editor.
The first step is to remix the official A-Frame Starter Project. You can remix the project by clicking the Remix Your Own button. You might also like to rename the project to make the title shorter, as we did in the last activity.
You should now have your own version of the Hello WebVR scene open in the Glitch Project Editor. The example we have included to show how to make changes from the Inspector in the Glitch project involves changing the position and size of the sphere in the Hello WebVR scene. However, you are welcome to make whatever changes you would like to the scene by following similar steps.
We are going to move the red sphere so that is above the cylinder and box shapes and we are also going to increase its size. The end result will look similar to the image below:

The first step is to move the red sphere so that it is above the other shapes.
You may want to view your scene in a new tab by clicking the Show button in Glitch and then selecting the In a New Window option. However, you can view the website within the editor by selecting the Next to The Code option instead, if you prefer that view. Once you are viewing the scene, open the Inspector by pressing ctrl + alt + i on your keyboard.
You can change the position by dragging the arrows on an entity when the translate () helper is selected. The changing of the position for the different axes are demonstrated in the animation shown below.
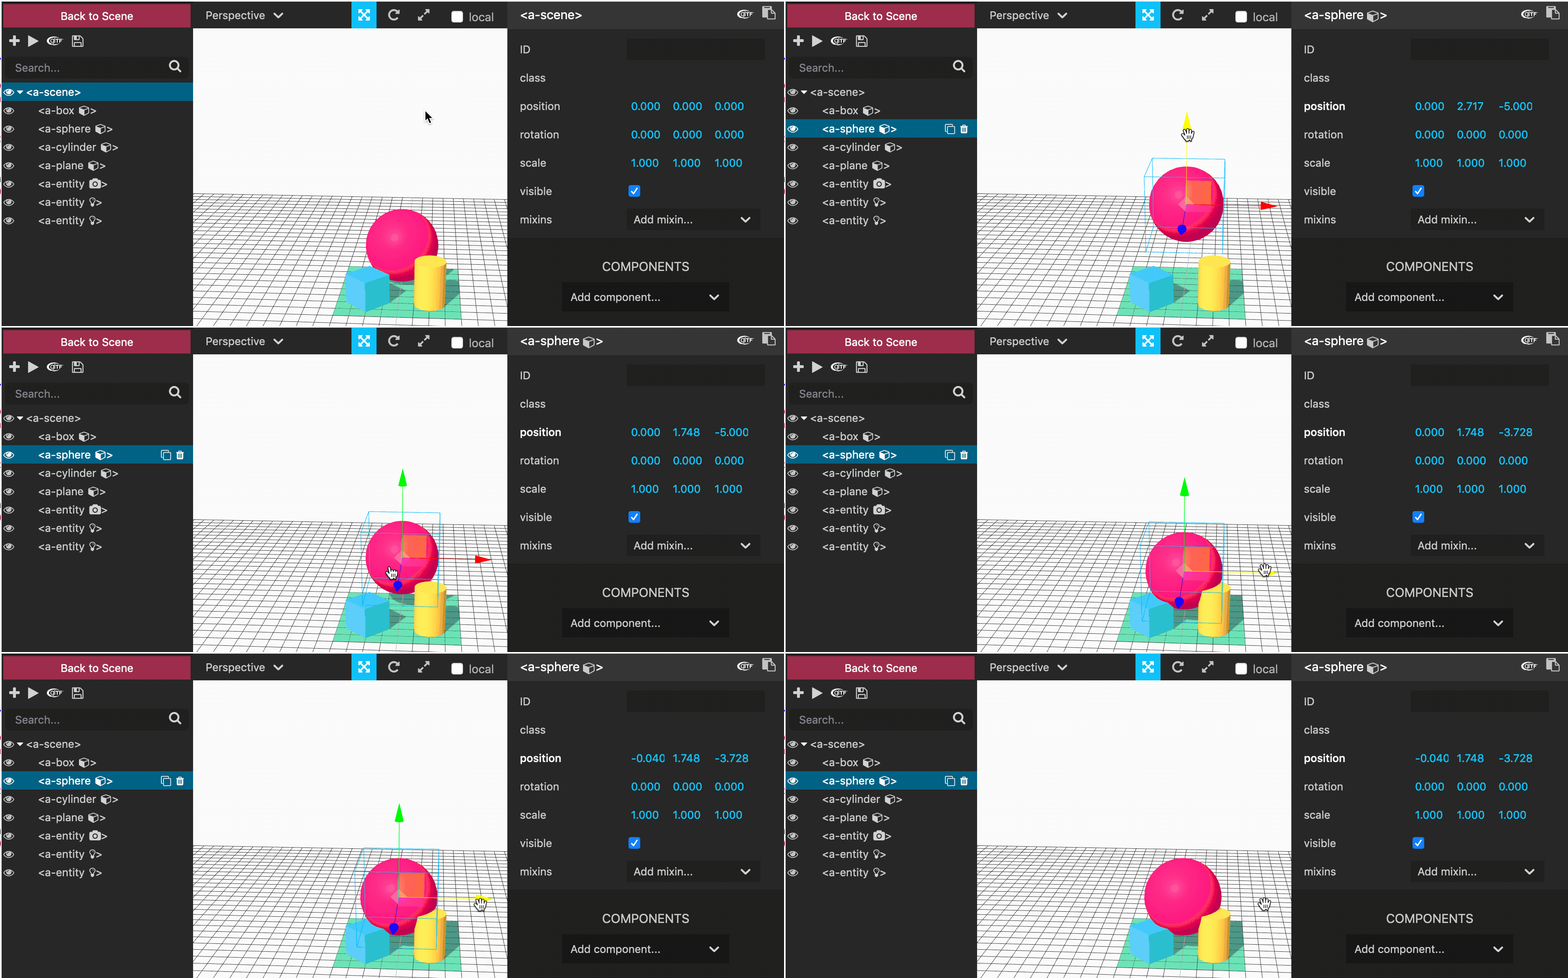
Note that, as can be seen in the animation above, the values for the corresponding axis change in the position section of the right pane when the position of the sphere changes.
You can move the sphere to any position that you like but in our example we have moved the sphere upwards so that is it has a y-coordinate of 4.
Our next step is to make the change to our HTML page that we made in the Inspector so that the sphere is still above the other shapes when we refresh the page. There are a couple of ways to make the change but they all involve changing the actual webpage (which is the index.html file in our Glitch project).
If we are only making a change to one of the entity’s properties (for example, the position) then a simple way to make this change is just to edit the property in the HTML tag, as demonstrated in the animation below.
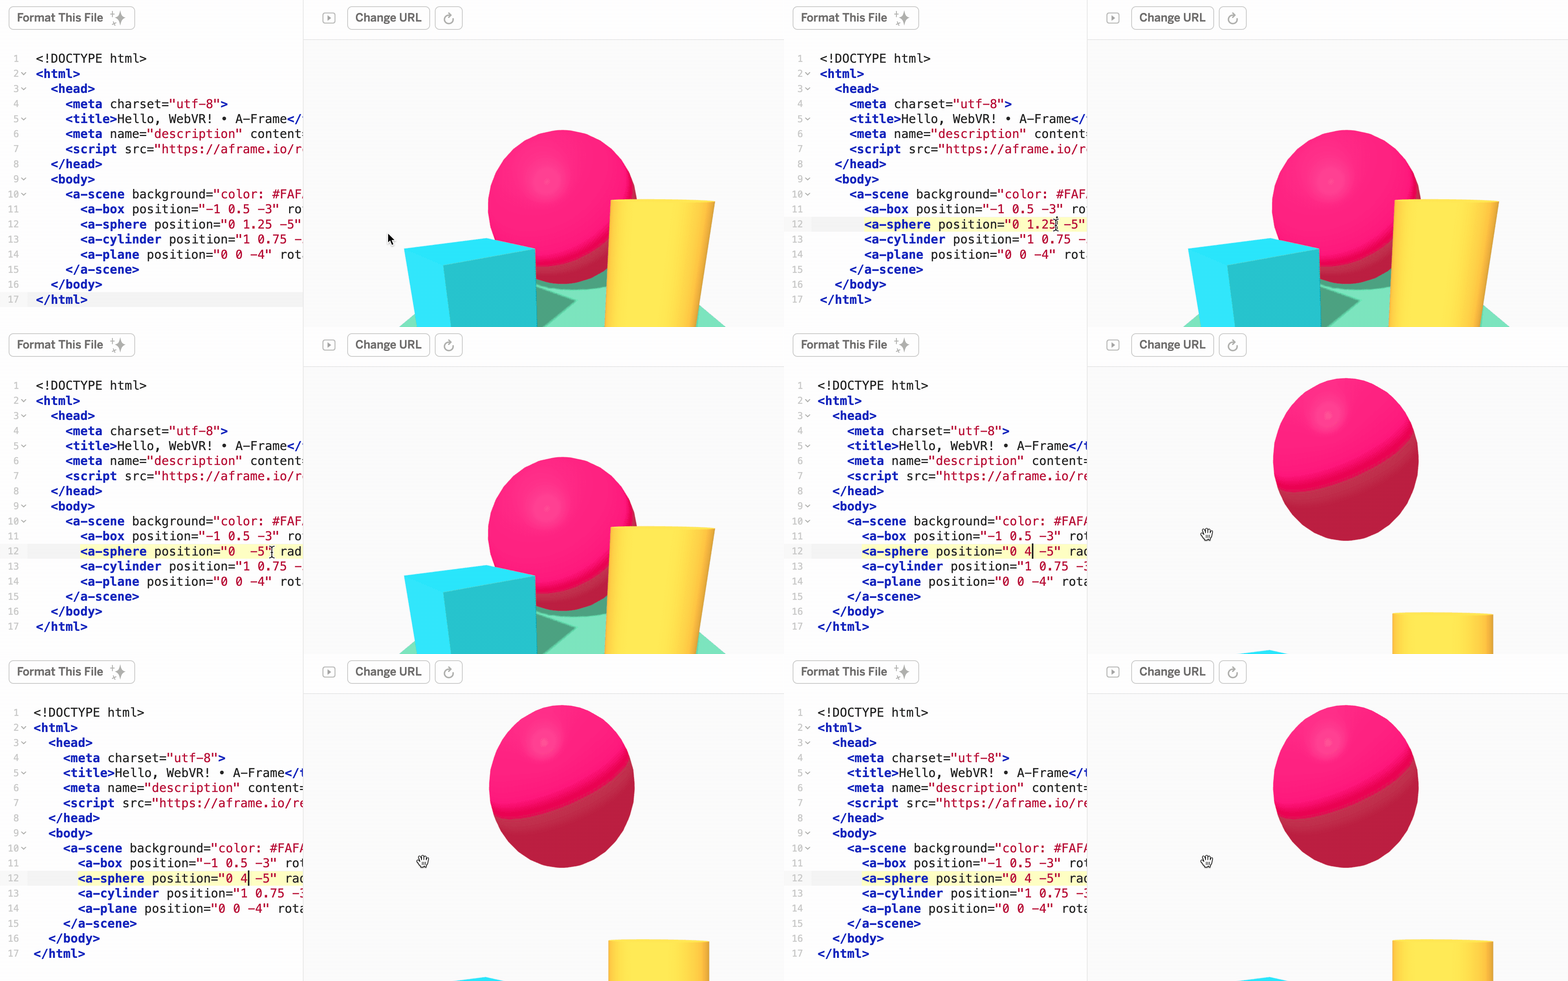
On the other hand, if we are making several changes to an entity, it is probably quicker for us to use the Copy entity HTML to clipboard feature in the Inspector and use that copied HTML to replace the entity’s tag in our HTML.
An example of how you can change the sphere’s position and then use the copied HTML to update the index.html file with the Glitch Project Editor is shown in the animation below:
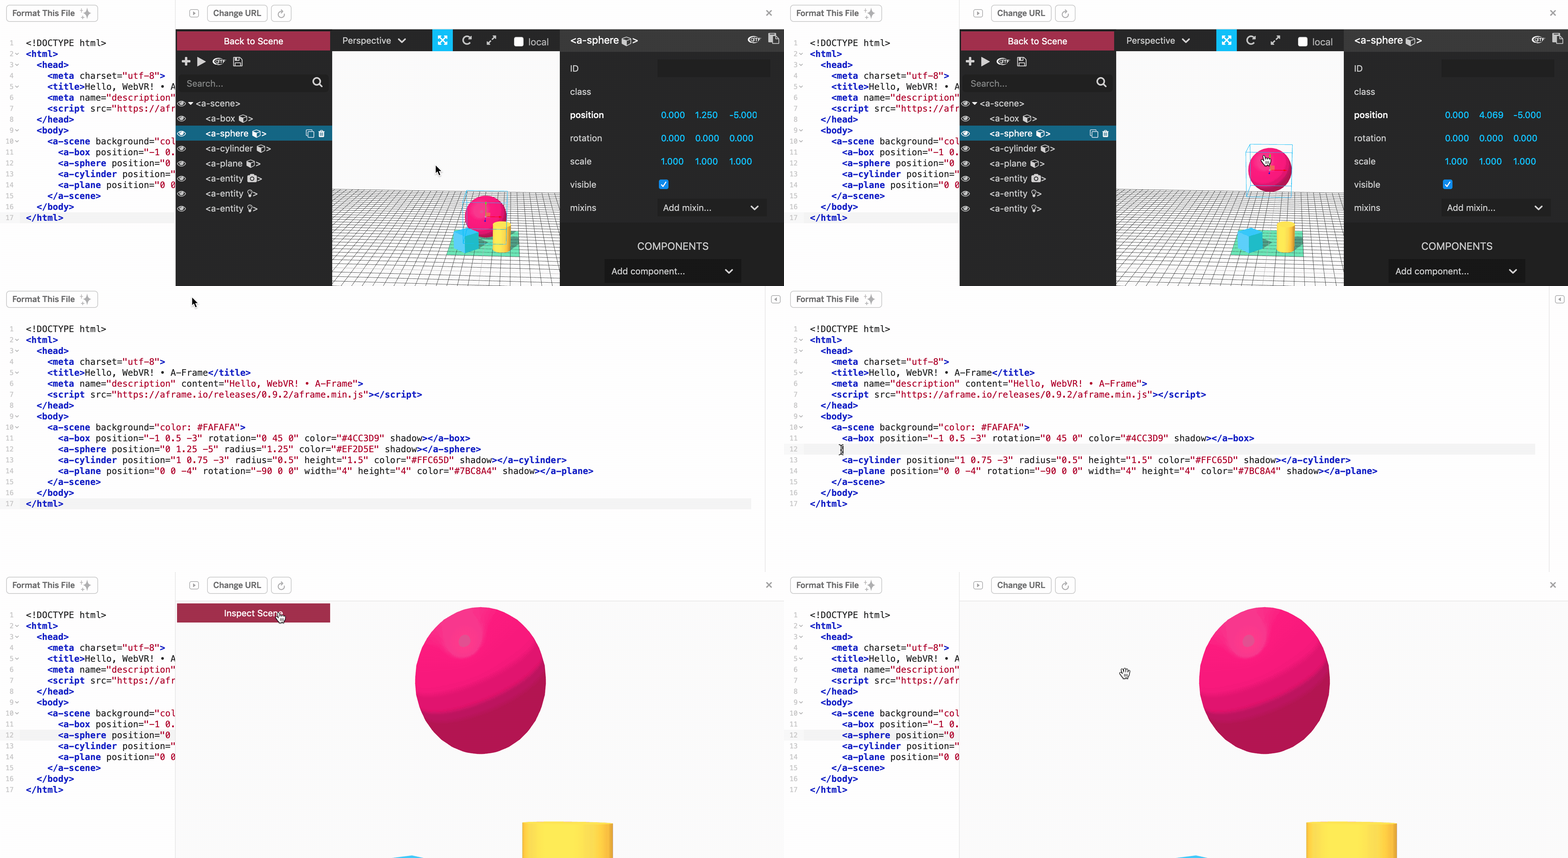
I completed the following actions in the animation above:
- Changed the position of the sphere in the Inspector
- Copied the code for the sphere with the Copy entity HTML to clipboard button in the Inspector
- Removed the tags for the sphere in the index.html page in the Glitch Project Editor
- Pasted the code for the sphere in the higher position into index.html in the Glitch Project Editor
- Refreshed the page so that the changes to the index.html page took effect
Note that Glitch projects will normally automatically refresh after you make changes to the HTML. We switched that feature off for the demonstration in the animation above.
You may have noticed that when you adjust the positions of entities in the Inspector, the coordinates in the copied HTML are given to 5 decimal places. In the example with the sphere, we probably don’t need to be that precise. We can remove the decimal places in the position and the scene will still look very similar, as shown in the animation below:
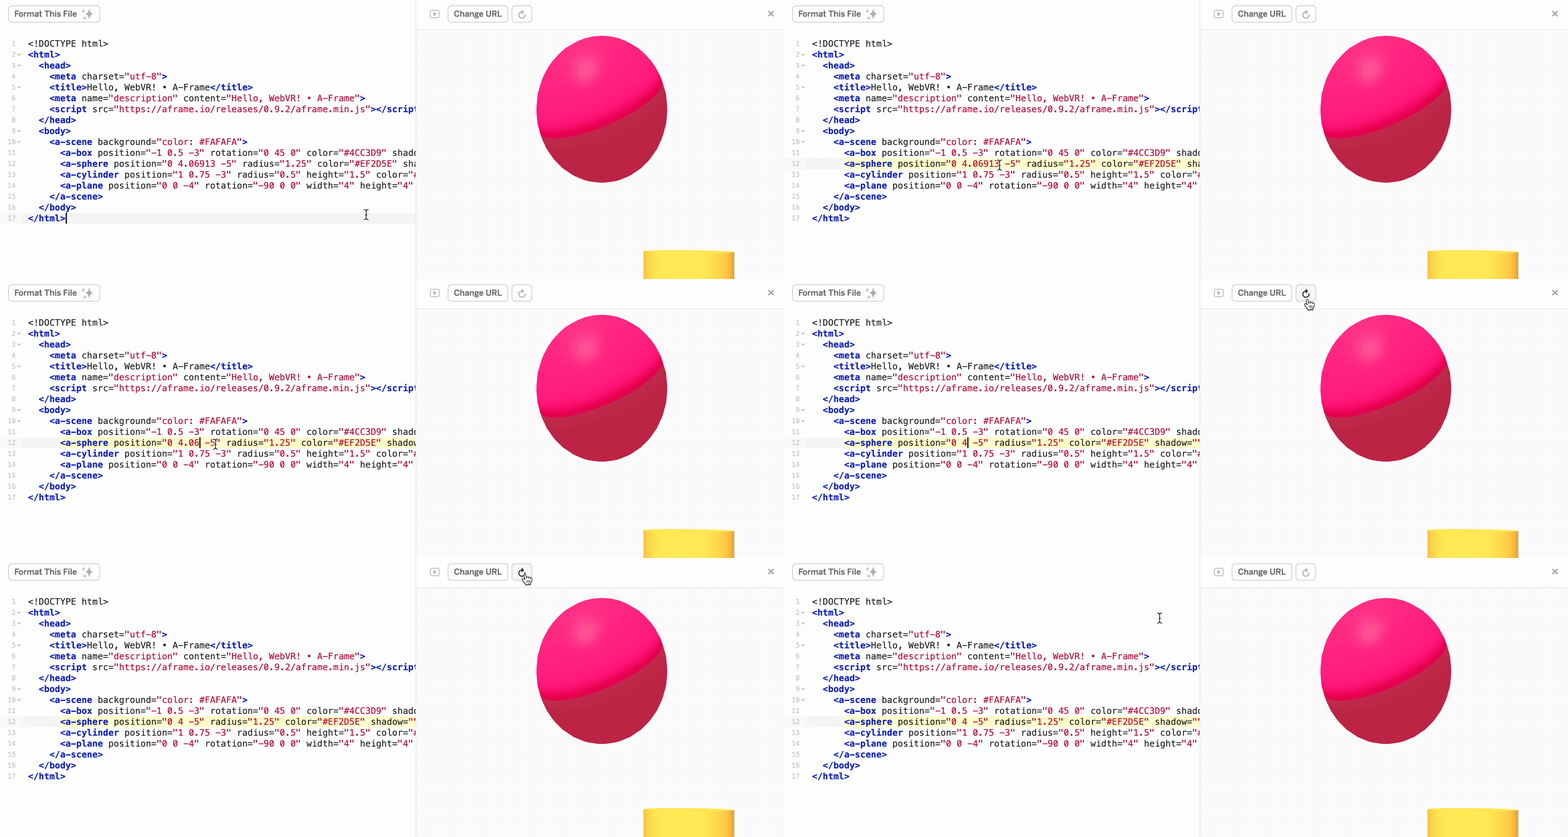
If you have followed those steps above, the sphere should now be positioned above the other shapes.
The next step is to increase the size of the sphere.
We can increase the size of the sphere in the scene by using the Inspector as well. Open up the Inspector with the ctrl + alt + i keys, like you did during the last part of the activity.
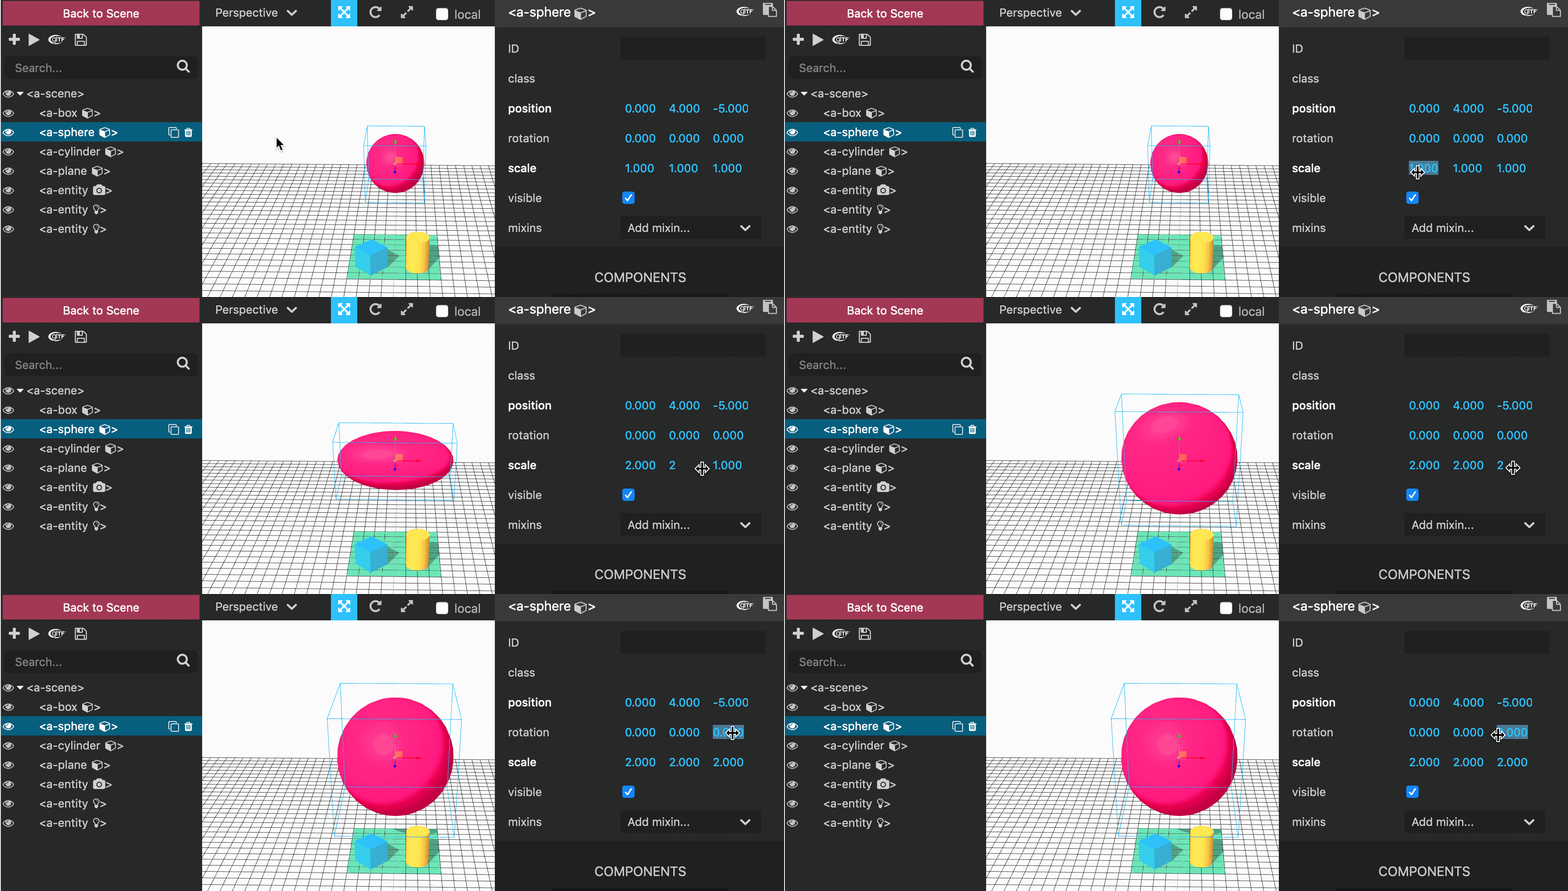
It is possible to use the scale helper at the top of the Inspector and then drag the arrows to scale up the sphere but we are going to edit the values directly instead. We are going to scale up the sphere to be 2 times bigger on the x, y and z axes.
To do this, change each of the values in the scale section from 1 to 2, as demonstrated in the animation below:
The next step is to copy the HTML from the Inspector and replace the <a-sphere> tag with the copied HTML. This step is shown in the animation below:
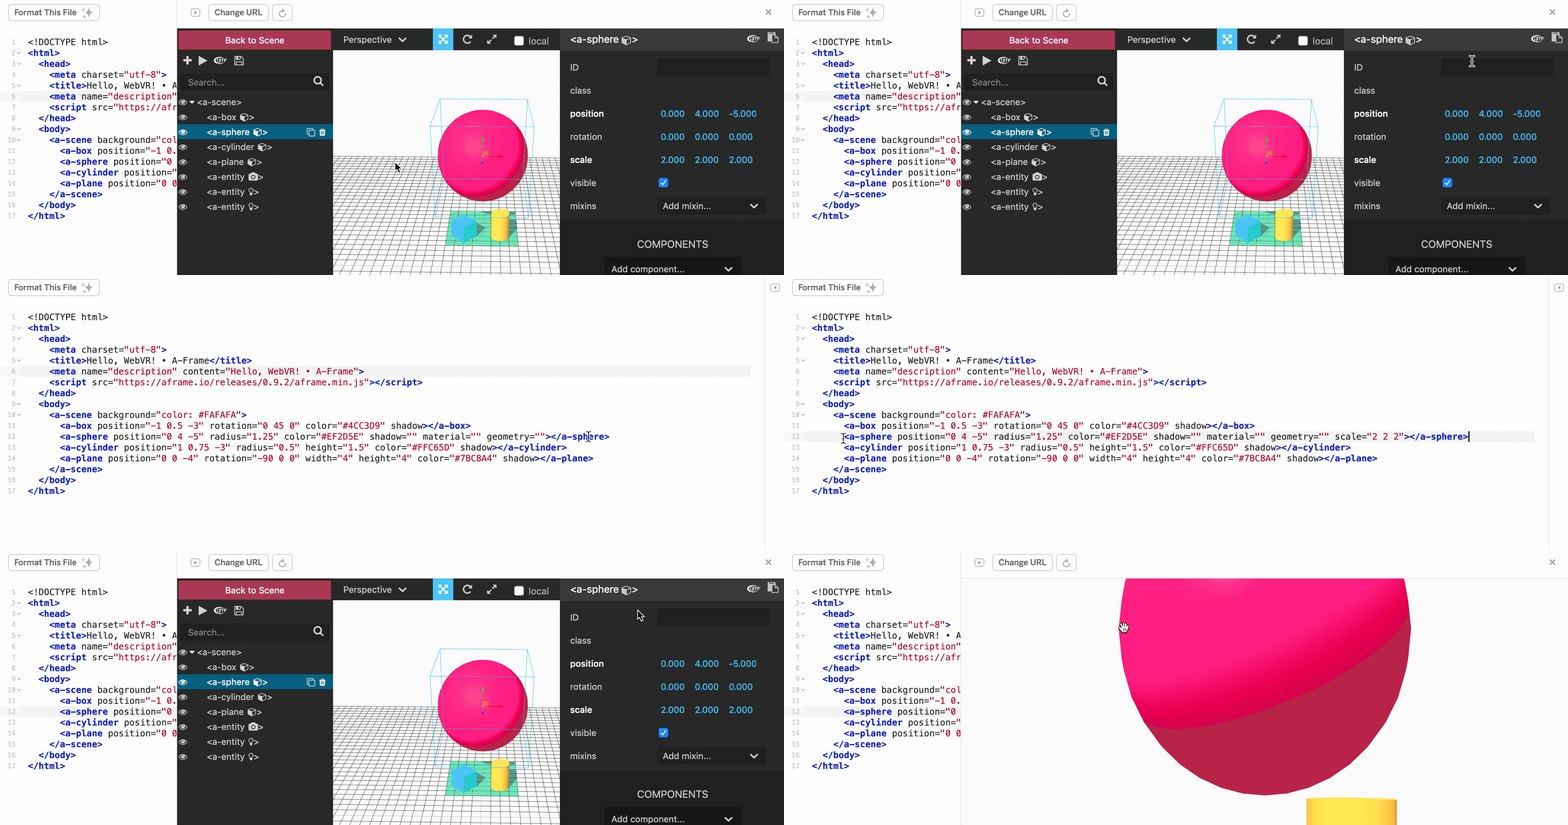
I completed actions that were similar to the repositioning of the sphere in the above animation:
- Copied the code for the sphere with the Copy entity HTML to clipboard button in the Inspector
- Removed the tags for the sphere in the index.html page in the Glitch Project Editor
- Pasted the code for the scaled up sphere in the index.html in the Glitch Project Editor
- Refreshed the page so that the changes to the index.html page took effect
Hopefully, you followed those steps above (or similar steps) for repositioning and scaling up the sphere. After you have completed those steps, the sphere and be scaled up to be 2 times bigger on the x, y and z axis.
If you have time before we move onto the next activity, try moving and changing the other shapes in the Hello WebVR scene and then changing the index.html page so that the changes you made in the Inspector are preserved. You could also try moving one or more of the shapes so that they are behind the camera. Note, that the camera starts by facing in the negative z direction, so shapes should have a position with a positive z coordinate if you want them to be behind the camera.
Next Steps
In the next activity, you will learn about the different shapes can be added to A-Frame scnes and you will use your knowledge of positioning to combine multiple shapes in one scene.