Using Gaze-based Interaction in A-Frame
Introduction
In this activity, you will learn about one way of interacting with entities in A-Frame: Gaze-based Interactions.
Gaze-based Interactions involve interacting with objects by looking at them. They are very useful interactions to use in apps created for lower-end VR headsets (such as a phone with a Cardboard headset) because these headsets usually do not have a separate controller to use for interactions.
We will use the cursor component in A-Frame and some JavaScript code to create a scene with Gaze-based Interactions.
The Interaction Project
We have created an Interaction Starter Project to demonstrate the use of Gaze-based Interactions in A-Frame. The first step of this activity is to open up that starter project and remix it.
You may want to try viewing the scene on a headset before we look at the code in more detail. What happens when you look at the different shapes in the scene?
The cursor (the black ring in the middle of the screen) will shrink and then go back to normal size after you look at a shape for a couple of seconds. You may notice that the box shape changes colour each time you look at it but that the other shapes do not change colour in the same way. We will add interactions to the other shapes, so that they change colour as well, in the next step of the activity.
The lines below create a cursor and attaches it to the camera, so that the cursor always follows the camera (where we are looking):
<a-entity camera position="0 1.6 0" look-controls>
    <a-entity
        animation__click="property: scale; startEvents: click; easing: easeInCubic; dur: 150; from: 0.1 0.1 0.1; to: 1 1 1"
        animation__fusing="property: scale; startEvents: fusing; easing: easeInCubic; dur: 1500; from: 1 1 1; to: 0.1 0.1 0.1"
        animation__mouseleave="property: scale; startEvents: mouseleave; easing: easeInCubic; dur: 500; to: 1 1 1"
        cursor="fuse: true; fuseTimeout: 1000"
        position="0 0 -1"
        geometry="primitive: ring; radiusInner: 0.03; radiusOuter: 0.05"
        material="color: black; shader: flat"
    >
    </a-entity>
</a-entity>
The properties that begin with animation__ in the above code control the animations that happen when the cursor interacts with other entities. For example, when we are looking at a shape, the cursor begins to ‘fuse’ and the cursor is animated with the instructions in the animation__fusing property. In that animation, the cursor scales down from full size (1 1 1) to a smaller size (0.1 0.1 0.1) over 1500 milliseconds when it ‘fuses’ with another object in the scene. That animation is what you see just before the box changes colour, after we look at with the cursor.
You may have noticed that there is another file in the project that was not in the other projects that we have worked on today: the script.js file. The code in that file makes the box shape change brightness when the cursor is pointed at the shape.
We will not look at the use of JavaScript in A-Frame scenes in much detail in this workshop. However, using JavaScript presents many opportunities to add functionality to your scenes and can be used to customise your scenes in pretty much any way that you can think of.
Adding Interactions
At the moment, the Gaze-based interaction only affects the brightness of the box. In this step, we will change the scene so that the other shapes change brightness when we look at them as well.
If you compare the other shapes’ tags to the tag for the box shape, which is shown below, you may notice that the box tag has a property that the other tags do not.
<a-box
    position="-1 0.5 -3"
    rotation="0 45 0"
    color="hsl(189, 65%, 50%)"
    cursor-listener
    shadow
    >
</a-box>
The box tag includes the cursor-listener property, which is the name of the component that we have created in the scripts.js file. The other shapes’ tags do not have this property but we will change that.
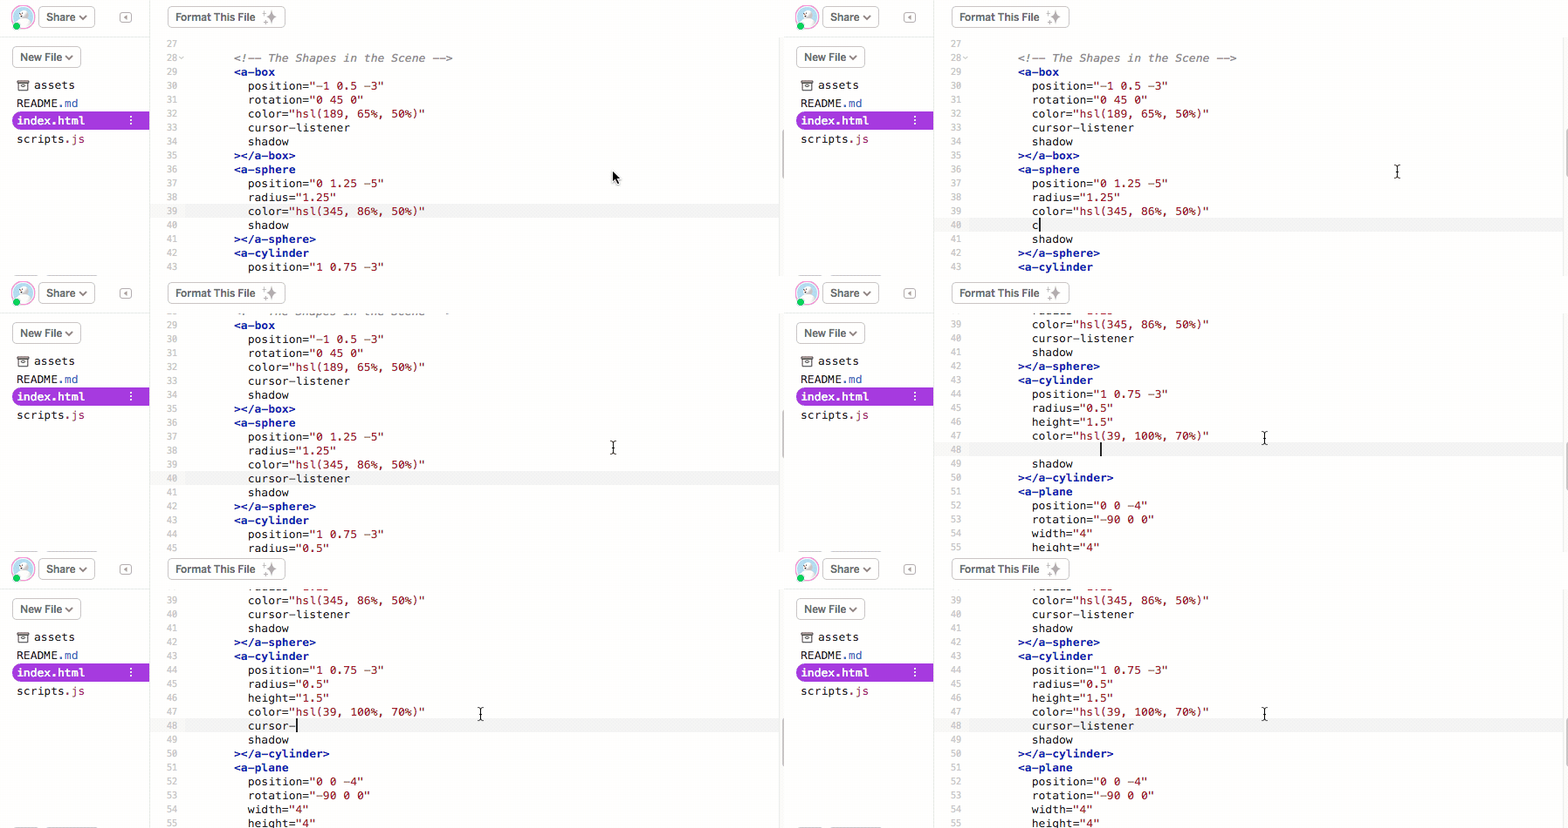
Next, add this property to the <a-sphere> and <a-cylinder> tags, as shown in the animation below:

Once you have added those properties, try viewing the scene again. The box, cylinder and sphere will now all change colour when you look at them. Adding this property to these tags results in the cursor-listener component being added to those shapes.
There are many possibilities for using Gaze-based Interaction, custom components and JavaScript code to create more complex VR scenes. For example, it is possible to combine Gaze-based Interaction with Checkpoint Controls to create a scene where you can move around by looking at different locations. The Hall VR Museum project created by Cecropia is a good example how you can use Gaze-based Interaction for movement.
Challenges:
- Make the cursor a different colour
- Make the cursor a different size
- Change the script.js file to change another property on the shapes (like the scale) when you look at them
- Create your own component that creates an interaction for the plane shape
In the next session you will learn about how animations can be added to a scene in A-Frame.